A Few Good Reasons Why Peter Knight Rocks

Peter Knight works with Massimo and Alex and co. at Tinker.it. He’s written some great AVR code, which is useful in Arduino.  For example:

Secret Thermometer takes advantage of the ATMega’s internal thermometer. Turns your ‘328-based Arduino into a thermometer with no extra parts.

Secret Voltmeter same idea, but this reads the internal analog-to-digital converter to tell you the Arduino’s supply voltage. Also works on the ATMega168.

He’s also done Cantarino, a speech synthesis engine; Auduino, a granular sound synthesis engine; a DMX library; and more.  Check them all out at the tinker.it code repository.

Multiple time stamp checks on a microcontroller

Sometimes you need to manage multiple events with a microcontroller that all require different timing.  For example, you might want to control a servomotor (which requires a 20 millisecond delay), blink an LED once a second, and read some sensors (which should be read as frequently as possible.  One way to handle this is to keep track of a time stamp for each event.  You constantly read the millis() and if enough time has elapsed since the last time a particular event occured, you do it again.

Continue reading “Multiple time stamp checks on a microcontroller”

Using an Accelerometer to Sense Which Way Is Up

ITP just got some nifty flat panel mounts that can rotate 360 degrees. They’re very easy to move, it takes only one hand. When I saw them, I thought, “what good is a rotating mount if the content on the screen can’t rotate too?” So I came up with a little system to sense the screen’s rotation. Here’s how to turn those screens into a very big iPhone. Thanks to Michael Dory for his help in coding this and Dan O’Sullivan for the final clue.

The screens have a mac mini mounted on the back to display digital content. I added an Arduino with an accelerometer mounted on it to sense the angle of the screen’s rotation, then sent that data into Processing.  This example doesn’t do much, but the code can be re-used for any Processing application that needs to know the screen’s rotation.

Rory Nugent modified my existing code and made it much better.  I’ve incorporated his changes here, thanks Rory.

Continue reading “Using an Accelerometer to Sense Which Way Is Up”

Sensorbase datalogger

Sensorbase.org is an open data repository run by the Center for Embedded Networked Sensing at UCLA. It’s a database of sensor databases. You can upload datasets to it, and you can browse other datasets as well. If you’ve never set up a database before but are interested in logging sensor data, it’s a good tool to get started. If you know what you’re doing already and you need to log a lot of sensor data, or compare it to similar work from others, it’s a convenient tool.

Since I like working with sensors and microcontrollers connected directly to the Internet, I thought it would be useful to be able to put data directly into Sensorbase from sensors connected to a microcontroller, without a personal computer in between.

Continue reading “Sensorbase datalogger”

Random Numbers and Physical Computing

Most microcontrollers don’t have a random function. Random functions are not truly random, they’re actually a complex mathematical formula that results in a number that “seems” random. That can take up lots of processing time, so it’s usually the first function to go when writing a microprocessor language.

In fact, most of what you do in programming physical computing projects is to figure out how to deal with the world’s natural randomness and make it look smooth. A photoresistor read through an analog-to-digital converter, for example, will never give you a nice steady number, it always fluctuates with tiny changes in lighting that your eye can’t see. Your consciousness is a great leveller for the sensors that are your eyes, ears, skin, nose, and taste buds When you move a photoresistor from one room to another, your readings will be totally different, and all of a sudden, you have to re-calculate what is “average” and what constitutes the lighting change that you want. And that’s just one of many examples. The fact is, data from sensors is filled with the noise of the real world. Plan for it in advance.

Technorati Tags: , ,


Continue reading “Random Numbers and Physical Computing”

Sound in to a Microntroller

Microcontrollers can take sound in as an analog input, for crude measurements. While 8-bit ones  (the Basic Stamp, BX-24, PIC, Arduino, etc) are not fast enough to read the frequency difference between various sounds, they can read sound levels. A line-level audio signal (which is what a typical CD or MP3 player produces) varies between -1V and 1V, a range of 2V total. If you raise that up so that it varies between, say, 3.5V and 1.5V, you can read it using the analog input on your microcontroller

First, if you have a microphone, you won’t be able to connect it directly. A microphone’s voltage, known as mic level voltage, is only a few millivolts at best. If you put it through a preamp such as a mixer board, or through an amplifier, you get a line level signal, which you can read.

A simple way to do this is to buy a preamplifier kit, something like the Velleman K1803 Universal Mono Preamplifier from Jameco (part no. 117612). For $8.95, it’ll save you some troubleshooting time, and cost about as much as the circuit below. Or you can build your own.

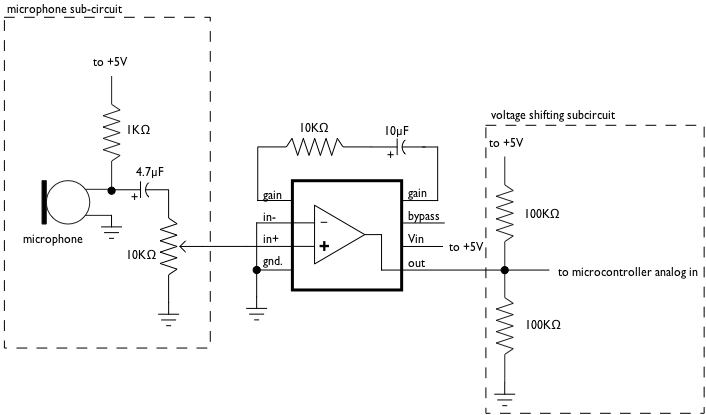
The following circuit uses a Condenser microphone element from Radio Shack (part no. 270-090C) and an amplifier chip also from Radio Shack (LM386 Audio Amplifier). The amplifier raises the microphone’s signal so it’s within line level tolerances, -1V to 1V. To raise that to a 1.5V to 3.5V range, we use a voltage divider (the two 100K resistors). Normally, the voltage between the resistors would be 2.5V (since their resistance is equal). When we add in the line level signal, we get 1.5V to 3.5V.

Note that the 10K variable pot is using all three pins of the potentiometer. The center pin goes to pin 2 of the amplifier, the end pins to the mic and pin 3, respectively. The variable resistor is your volume knob. I used an audio taper pot, since I wanted the curve of the pot to follow the sound’s volume.

Note that the capacitors are polarized electrolytic capacitors, so it matters which way they face.

In the BX-BASIC code, I found my base value (when all was silent) was about 512. So I subtracted that, took the absolute value of the result (so that negative numbers would always read as positive), and got a sound level varying between about 1 and 500. You may need to adjust these values depending on your setup.

dim soundIn as integer

Sub main()
    call delay(0.5)  ' start  program with a half-second delay 

    do
        soundIn = abs(getADC(13)- 512)

        debug.print "soundIn = " ; cStr(soundIn)
    loop

End Sub

Here’s the same code in Wiring/Arduino:

void setup() {
	Serial.begin(9600);
}

void loop() {
	// read the audio in on analog 0:
	int soundLevel = analogRead(0) -512;
       Serial.print( "soundIn = ");
	Serial.println(soundLevel, DEC);
}