As we planned for Christmas this year, my partner suggested that maybe we should replace the lights for the tree. “While we’re at it,” she asked, “is there anything out there that’s more controllable than just the ones that twinkle on and off?”
“Well,” I said, “there are NeoPixels…”
We decided that it would be great to have a tree where the lights looked and acted like candles, flickering gently in a soft, warm glow, and fading from a bright orange down to a low reddish glow by the end of the evening. We also wanted to realize the cheesy quote from It’s A Wonderful Life that “every time a bell rings, an angel gets its wings.”
Here’s a timelapse of the tree in action:
When you ring the bell, this happens:
The process of making it gave a chance to work with:
- NeoPixels and the Adafruit NeoPixel library
- Serial input to Arduino as a testing method
- the capacitive sensor library for Arduino
- The Mailbox class of the Bridge library for the Arduino Yún
- Building a web interface for the Arduino Yún
- Using cron, Mailbox, and curl for task-scheduling on the Arduino Yún
You can find the code and circuit in the gitHub repository for this project.
Hardware
I started looking for affordable strings of NeoPixels (or WS2811 addressable RGB LEDs) on AliExpress.com. As I was looking, I learned that Blinkinlabs had just released a version of their BlinkyTape in a string format. Having the built-in Atmega32U4 and microUSB (basically an Arduino Leonardo in the plug) would make my life a lot simpler, so I ordered a set of them. Since the bare strips were a lot cheaper, I ordered a couple sets of those as well, to finish off the tree.
I considered a few different options for building this system:
- Control the NeoPixels from a separate controller, like an Uno, Leonardo, or Adafruit Trinket. The advantage is that it’s cheap. The disadvantage is that I couldn’t do a nice user interface.
- Use the Blinkinlabs strings. Advantage: convenient, no wiring. Disadvantage: no user interface, and more expensive than option 1, and difficult to add the capacitive touch controller for the bell.
- Control the NeoPixels from an Arduino Yún. Advantage: great user interface options, plus built-in Atmega32U4 for real-time control. Disadvantage: more expensive controller.
Since I wanted to build a web interface for control, and set a schedule for the lights each day, I went for option 3. The code was mostly developed using option 2, then adapted slightly for the final version. The final system looked like this:
The Blinkinlights lights arrived first, so I started right away with color control, looking for just the right shades of orange and red to make the candle effect. I use the Adafruit NeoPixel library. The Adafruit NeoPixel Uberguide explains them well. You can set colors using a standard 24-bit number like the web. For example, 0x0000FF is blue; 0xFF0000 is red; and 0x00FF00 is green. I had an example that would let me change each pixel’s color serially so I could test the colors, then combined it with owaunandrew‘s Processing ColorPicker sketch so that I could pick colors from the desktop. My NeoPixel color picker sketch for Processing can be found on in the gitHub repo for this project.
Flickering and Fading to Red
I needed an array of colors for the bright state, and a final color for the dim state, which I picked with the color picker. This started my list of global variables:
// initial reference color range:
const unsigned long referenceColors[] = {0xCB5D0F, 0xB4470C, 0x95310C, 0x854E0B};
// the final color of all pixels before they flicker out:
const unsigned long finalColor = 0x1F0F02;
// changing range of keyframe colors for the pixels to flicker to:
unsigned long keyColors[] = {0xCB500F, 0xB4410C, 0x95230C, 0x853E0B};
The fading process had to have two parts: one part to generate the flicker from one reference color to another, and a second part to fade all the reference colors down to the final color. Neither the reference colors nor the final color should change, so they could be consts. In order to enable reset, I made a second array, keyColors[], which contains the active set of colors at any given moment. The color values in keyColors[], initially a copy of referenceColors[], are gradually faded down toward finalColor. To manage the flicker effect, I needed to keep track of each pixel’s current color and its target color. That called for two more arrays:
unsigned long targetColor[numPixels];    // next target for each pixel
unsigned long pixelColor[numPixels];     // current color for each pixel
Rounding out the global variables, there’s the pin number for controlling the strip, the instance of the Adafruit NeoPixel library, the size of the keyColors[] array, and boolean flags for whether the lights are running, and for whether the fade is finished (these last come into play later on).
The flicker happens in a function called flickerPixels(), and the fade down to red is done in fadeToRed(). There’s also an important function that compares two colors by separating them into their red, green, and blue components, and returning a color that’s one step closer to the target color.
Here’s the initial sketch. Note that the control pin number is 12 here, not 13 as you’ need for the Blinkinlights strip. I changed from the Blinkinlights strings to regular strings later on:
#include <Adafruit_NeoPixel.h>

const int controlPin = 12;  // the I/O pin that the neopixel data signal is on

const int numPixels = 50;    // number of pixels in the strip
// initialize the strip:
Adafruit_NeoPixel strip = Adafruit_NeoPixel(numPixels, controlPin, NEO_RGB + NEO_KHZ800);

// initial reference color range:
const unsigned long referenceColors[] = {0xCB5D0F, 0xB4470C, 0x95310C, 0x854E0B};
// the final color of all pixels before they flicker out:
const unsigned long finalColor = 0x1F0F02;
// changing range of keyframe colors for the pixels to flicker to:
unsigned long keyColors[] = {0xCB500F, 0xB4410C, 0x95230C, 0x853E0B};

unsigned long targetColor[numPixels];    // next target for each pixel
unsigned long pixelColor[numPixels];     // current color for each pixel

// count of keyframe colors:
int numColors = sizeof(keyColors) / 4;
unsigned long slowFadeInterval =  169400;   // in millis, the time between fade changes
unsigned long lastFade = 0;                 // timestamp of the last call to fadeToRed()
int flickerInterval = 30;                   // in millis, the delay between flicker steps

boolean running = true; // whether or not your're running
boolean finished = false; // whether or not the slow fade is finished
void setup() {
  strip.begin();          // initialize pixel strip
}

void loop() {
  // create the flicker effect:
  if (millis() % flickerInterval < 2) {
    flickerPixels();
  }

  // gradually fade the keyframe colors lower and more toward the red:
  if (millis() - lastFade >= slowFadeInterval) {
    finished = fadeToRed();
  }
  // update the strip:
  strip.show();
}

/*
  this function creates the flicker effect:
*/
void flickerPixels() {
  // iterate over all pixels:
  for (int thisPixel = 0; thisPixel < numPixels; thisPixel++) {
    // if the target color matches the current color for this pixel,
    // then pick a new target color randomly:
    if (targetColor[thisPixel] == pixelColor[thisPixel]) {
      int nextColor = random(numColors);
      targetColor[thisPixel] = keyColors[nextColor];
    }
    // fade the pixel one step from the current color to the target color:
    pixelColor[thisPixel] = compare(pixelColor[thisPixel], targetColor[thisPixel]);
    // set the pixel color in the strip:
    strip.setPixelColor(thisPixel, pixelColor[thisPixel]);// set the color for this pixel
  }
}

/*
  This function fades all the key colors toward a low reddish orange
*/
boolean fadeToRed() {
  boolean result = true;
  // iterate over all pixels:
  for (int thisColor = 0; thisColor < numColors; thisColor++) {
    // calculate a new keyColor closer to the final color:
    keyColors[thisColor] = compare(keyColors[thisColor], finalColor);

    // if all the keyColors == the final color then you're finished:
    if (keyColors[thisColor] != finalColor) {
      result = false;
    }
  }
  lastFade = millis();
  return result;
}

/*
  takes two colors and returns a color that's a point on each axis (r, g, b)
  closer to the target color
*/
unsigned long compare(unsigned long thisColor, unsigned long thatColor) {
  // separate the first color:
  byte r = thisColor >> 16;
  byte g = thisColor >>  8;
  byte b = thisColor;

  // separate the second color:
  byte targetR = thatColor >> 16;
  byte targetG = thatColor >>  8;
  byte targetB = thatColor;

  // fade the first color toward the second color:
  if (r > targetR) r--;
  if (g > targetG) g--;
  if (b > targetB) b--;

  if (r < targetR) r++;
  if (g < targetG) g++;
  if (b < targetB) b++;

  // combine the values to get the new color:
  unsigned long result = ((unsigned long)r << 16) | ((unsigned long)g << 8) | b;
  return result;
}
The Twinkle Effect (or “Every time a bell rings…”)
Once the flickering and fading was working, I added a routine to make a random light twinkle to white, for the “angel gets its wings” effect. This was simply a matter of picking a random pixel and setting its color to white, then letting the flickerPixels() and fadeToRed() functions restore it.
I didn’t want to twinkle just any light, because some lights are not visible from the front of the tree. So I made a new global array, visiblePixels[], and populated it with only the light numbers that were visible from the front of the tree.
Here’s the twinkle() function:
// new global variables:
int visiblePixels[] = {6, 7, 8, 9, 10, 11, 12, 13, 14, 15, 28, 29, 30, 31, 32, 33, 34, 35, 36, 37, 40}; // pixels visible on the front of the tree
int visibleCount = sizeof(visiblePixels) / 2;

/*
this function creates the twinkle effect:
*/
void twinkle() {
  int whichPixel = random(visibleCount);
  int thisPixel = visiblePixels[whichPixel]; // pick a random pixel from the visible list
  pixelColor[thisPixel] = 0xFFDDDD;          // set its color to white
}
To test this function, I just used a serial input check in the main loop at first, like so:
   if (Serial.available() > 0) {
     char input = Serial.read();
     if (input == 'x') {     // if the input is x, twinkle a light
        twinkle();
     }
   }
To determine the visible lights, I wrote a sketch that allowed me to turn and off each light with a serial command, and asked Denise to tell me when she could see each light or not as I turned it on or off. The sketch saves a list of all the lights left on, and prints them out as a list. You can see that sketch in the project’s gitHub repository.
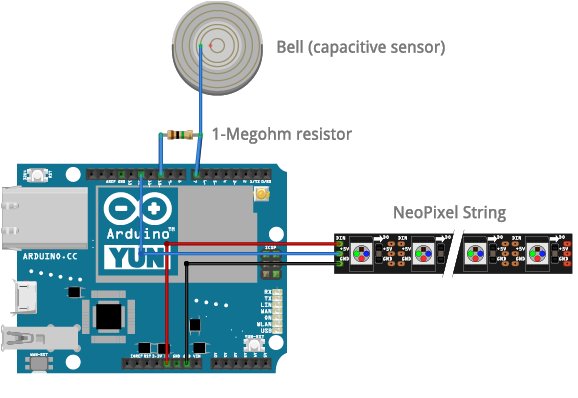
Once I knew the twinkle effect worked the way I wanted it to, I added a capacitive touch sensor to the tree. I wired a piece of 22-AWG wire to a jingle bell that was hung from one branch, then ran the wire down the trunk to the processor, which was hidden under the skirt at the base of the tree. The capacitive touch sensing circuit took some experimentation to get it stable. To get this right I used the basic examples from the CapacitiveSensor Library and modified the resistor until I got a value that triggered reliably when a person rang the bell. The stability of the circuit increased when I plugged the board was plugged into a grounded AC outlet. The final circuit is shown above. Here’s the final code for testing the sensor:
#include <CapacitiveSensor.h>

CapacitiveSensor bell = CapacitiveSensor(10, 7);   // initialize cap touch library
long touchTime = 0;                      // time of last touch
int touchState = 0;                      // if the bell is being touched
int threshold = 1000;                    // touch sensitivity threshold
int touchDelay = 500;                    // how long to delay before resetting touch sensor

void setup() {
  Serial.begin(9600);
   bell.set_CS_AutocaL_Millis(0xFFFFFFFF);     // turn off touch sensor autocalibrate
}

void loop() {
   // read touch sensor:
  long bellTouch =  bell.capacitiveSensor(30);
  // if the bell is touched and it wasn't touched
  // on the last check:
  if (bellTouch > threshold && touchState == 0) {
    touchState = 1;
    Serial.println("twinkle");
    touchTime = millis();
  }

  // if the touch delay has passed, reset touchState:
  if (millis() - touchTime > touchDelay) {
    touchState = 0;
  }
}
It’s important to test this with a println() statement, to make sure the twinkle effect is triggering only once every time you touch the bell. Otherwise, a single touch will trigger multiple lights to twinkle, which is not the desired effect.
Shutdown and Reset
When the fading effect reached the end of its run, the tree just sat with the lights in a dim red state. That’s no fun. So I wrote a function to turn off the lights one at a time when the tree reached the final color, and a reset function to set it back to its original state. Initially I triggered these with serial commands like the twinkle effect test, but later I added a web interface for them (see below). Here are the resetStrip() and turnoff() functions:
/*
 This function resets all the pixels to their base colors:
*/
boolean resetStrip() {
 // iterate over the pixels:
 for (int pixel = 0; pixel < numPixels; pixel++) {
 // pick two random colors from the keyframe colors:
 int nextColor = random(numColors);
 int lastColor = random(numColors);
 targetColor[pixel] = referenceColors[nextColor];
 pixelColor[pixel] = referenceColors[lastColor];
 // set the pixel color:
 strip.setPixelColor(pixel, pixelColor[pixel]);// set the color for this pixel
 }

 // reset the keyColor array with the reference color array:
 for (int p = 0; p < numColors; p++) {
 keyColors[p] = referenceColors[p];
 }
 finished = false;
 return true;
}
boolean turnOff() {
  // iterate over the pixels:
  for (int pixel = 0; pixel < numPixels; pixel++) {

    // set the pixel color:
    strip.setPixelColor(pixel, 0);// set the color for this pixel
    strip.show();
    delay(300);
  }
  return false;
}
Now that these functions are introduced, I used the running flag to keep the lights off when they shouldn’t be running. The flag is initialized as true, and turnOff() sets it to false.
I added a reset for the strip to the setup:
void setup() {
  strip.begin();          // initialize pixel strip
  resetStrip();           // start the long fade
}
The main loop now looks like this:
void loop() {
    // listen for serial commands:
    if (Serial.available() > 0) {
      char input = Serial.read();
      if (input == '0' ) {      // 0 means turn off lights
        running = turnOff();
      }
      if (input == '1') {       // 1 means turn on lights
        running = resetStrip();
      }
      if (input == 'x') {     // x means twinkle
        twinkle();
      }
    }

  if (running) {      // continue the long fade
    // create the flicker effect:
    if (millis() % flickerInterval < 2) {
      flickerPixels();
    }

    // gradually fade the keyframe colors lower and more toward the red:
    if (millis() - lastFade >= slowFadeInterval) {
      finished = fadeToRed();
    }
  }
  // when you reach the final colors, turn off:
  if (finished) running = turnOff();

  // read touch sensor:
  long bellTouch =  bell.capacitiveSensor(30);
  // if the bell is touched and it wasn't touched
  // on the last check:
  if (bellTouch > threshold && touchState == 0) {
    touchState = 1;
    twinkle();
    touchTime = millis();
  }

  // if the touch delay has passed, reset touchState:
  if (millis() - touchTime > touchDelay) {
    touchState = 0;
  }

  // update the strip:
  strip.show();
}
The Web Interface
Once I had the lights working with the bell, and the fading effect working and a way to send in messages to the lights, I wanted to make a web interface. This is where the Yún was useful.
Note: Everything shown before this point will work on any Arduino, but the rest of this project will run only on an Arduino Yún.
The Bridge library has a Mailbox class that allows you to pass messages from the Yún’s linux processor to the 32U4 processor using a RESTian web interface. When you’ve added Mailbox to your sketch, you can make a web request like this:
http://arduino.local/mailbox/hello
And the 32U4 processor can get the last part of the string using a couple of lines of code, like this:
String message;
// read all the messages present in the queue
      while (Mailbox.messageAvailable())
      {
        Mailbox.readMessage(message);   // get the message
        Serial.println(message);        // print it out
The web interface for our tree is pretty simple:
http://arduino.local/mailbox/on turned the tree on by calling the reset function
http://arduino.local/mailbox/off turned the tree off
http://arduino.local/mailbox/twinkle gives an angel its wings
To implement this on the Arduino processor, I removed the serial input block and replaced it with the following Mailbox input block:
// new additions to the top of the sketch:
#include <Bridge.h>
#include <Mailbox.h>

// additions to the setup:
void setup() {
  Bridge.begin();         // initialize Bridge
  Mailbox.begin();        // initialize Mailbox
  // rest of setup goes here
}

// changes to the main loop:
void loop() {
  String message;
  // read the next message present in the queue
  while (Mailbox.messageAvailable()) {
    Mailbox.readMessage(message);
    if (message == "off" ) {
      running = turnOff();
    }

    if (message == "on") {
      running = resetStrip();
    }

    if (message == "twinkle") {
      twinkle();
    }
  }
  // rest of the main loop goes here
}
To build a web page for it, I used a little javaScript to automate the buttons using Lauren McCarthy’s p5.js library. I stored the web page on an SD card and installed on the Yún using the instructions in the TemperatureWebPanel example. I got the ding sound from orangefreesounds.com.
Here’s the HTML:
<!DOCTYPE html>
<html>
	<head>
		<script src="//cdnjs.cloudflare.com/ajax/libs/p5.js/0.3.14/p5.min.js"></script>
		<script src="//cdnjs.cloudflare.com/ajax/libs/p5.js/0.3.14/addons/p5.dom.js"></script>
		<script src="//cdnjs.cloudflare.com/ajax/libs/p5.js/0.3.14/addons/p5.sound.js"></script>
		<script>
	var twinkleButton, resetButton, offButton, result, mySound;

function setup() {
  // load the bell sound
  mySound = loadSound('/tree/Ding-sound-shiny.mp3');

  // create the twinkle button:
  twinkleButton = createButton('Give an angel its wings');
  twinkleButton.position(150, 65);        // position it
  twinkleButton.mousePressed(twinkle);    // set the mousePressed callback function

  // create the reset button:
  resetButton = createButton('reset lights');
  resetButton.position(150, 95);        // position it
  resetButton.mousePressed(resetStrip); // set the mousePressed callback function

  // create the lights off button:
  offButton = createButton('turn off lights');
  offButton.position(150, 125);        // position it
  offButton.mousePressed(turnoff);     // set the mousePressed callback function
}

function twinkle() {
	result = loadStrings("/mailbox/twinkle");
	mySound.play();
}

function resetStrip() {
	result = loadStrings("/mailbox/on");
}

function turnoff() {
	result = loadStrings("/mailbox/off");
}

       </script>
	</head>
	<body>
        </body>
</html>
Automatic Scheduling
Since I wanted to have the tree turn on automatically at sundown and off after we went to bed, I set up a cron job on the Linux side of the Yún. Cron is a linux tool for scheduling tasks to happen. You set up a file, called a crontab, which sets the time you want a command to happen and the command you want to happen at the given time. A typical cron task might look like this:
0 12 * * * echo "hello"
This job would print out the word “hello” every day at 12PM. The five columns of numbers are minutes (0 – 59), hour (0 – 23), day of month (0 – 31), month (0 – 12), day of week (0 – 6). A * in any column means to do it for every instance of that timespan. Here’s a useful cron quick reference. Here are the details for cron on openWRT, the Yún’s linux distribution.
Cron and the Bridge Mailbox class are useful ways to send timed messages from the linux side of the Yún to the Arduino side. The Linux processor can keep track of time in more complex ways, freeing the Arduino processor to focus on what it does well: realtime control of outputs and reading of sensors. By setting up a good crontab, and programming the Arduino processor to check messages regularly, you can achieve lots of different timed effects.
To fill the Arduino processor’s mailbox, I used the linux curl command that allows you to make a HTTP request from the command line, like so:
curl 'http://arduino.local/mailbox/twinkle'
Since the web interface was on the same linux processor that was running the web service to which I was making requests, I knew that the address was http://localhost. The addresses were therefore:
http://localhost/mailbox/on

http://localhost/mailbox/off

http://localhost/mailbox/twinkle
I wanted the lights on at 7AM and off at 8:15AM every day, then back on at 4:45PM and off again at 11PM every day. So I used the web interface and the curl command calling /mailbox/on and /mailbox/off as needed. My crontab file looked like this:
0 7 * * * curl 'http://localhost/mailbox/on'

15 8 * * * curl 'http://localhost/mailbox/off'

45 16 * * * curl 'http://localhost/mailbox/on'

0 23 * * * curl 'http://localhost/mailbox/off'
To install and start this crontab on the Yún, I connected to the linux side via ssh from the command line of my computer:
$ ssh root@arduino.localhost
Then when I was in, I issued the following command to change the default editor to nano, then start and enable cron:
$ export EDITOR=nano

$ sh /etc/init.d/cron start

$ sh /etc/init.d/cron enable
then to edit the crontab:
$ crontab -e
Then I added the lines above to the crontab file, and finished by saving it with control-X and Y to confirm. After that, it ran on its own, as long as the Yún was up and running.
The Finishing Touches
Not content to stop there, I really wanted to make the fade sequence more flexible. I picked the value for slowFadeInterval so that I’d get about 4 hours of fading, but what if I wanted more than that, or less? Or what if I wanted to “fast-forward” the fade? I implemented these features with a couple more functions.
First, I needed to know how many steps the total fade takes. To get that, you take the initial colors and the final color, separate them into their component red, green and blue components, then look for the largest difference. Here’s a function that does that:
/*
  This function calculates the fadeToRed() steps
*/
long calcFadeSteps() {
  // separate the final color:
  byte targetR = finalColor >> 16;
  byte targetG = finalColor >>  8;
  byte targetB = finalColor;

  long numSteps = 0;
  // loop over the reference colors
  for (int thisColor = 0; thisColor < numColors; thisColor++) {
    // separate into R, G, B
    byte r = referenceColors[thisColor] >> 16;
    byte g = referenceColors[thisColor] >>  8;
    byte b = referenceColors[thisColor];

    // calculate max of reference color - final color:
    int redDifference = abs(r - targetR);
    numSteps = max(redDifference, numSteps);
    int greenDifference = abs(g - targetG);
    numSteps = max(greenDifference, numSteps);
    int blueDifference = abs(b - targetB);
    numSteps = max(blueDifference, numSteps);
  }
  return numSteps;
}
Once you know the number of steps, you need to know how many minutes you want those steps to take. The total cycle is the total fade time divided by the number of steps. Here’s a function for that:
/*
  This function calculates the interval for the fadeToRed() steps
*/
unsigned long calcInterval(long fadeMinutes) {
  if (fadeMinutes <= 0) return 0;
  unsigned long result = 0;
  long steps = calcFadeSteps();

  // return total fade time / numSteps
  result = (fadeMinutes * 60 * 1000) / steps;
  return result;
}
To fast-forward, I decided the interface would be a slider that indicates the percentage of the cycle to which you want to jump. To implement that, I reset the strip, then step through a percentage of the total steps to get to the point I want. Here’s the function that does that:
/*
  This function fastforwards to a given percentage
  of completion of the fadeToRed cycle
*/
void fastForward(int targetPercent) {
  if (targetPercent <= 0) return;    // if targetPercent isn't valid, return

  resetStrip();                      // reset the color values
  long steps = calcFadeSteps();      // calculate how many steps to take

  // calculate how many steps to take:
  long targetStep = (steps * (100 - targetPercent)) / 100;
  // step through that many steps:
  while (steps > targetStep) {
    fadeToRed();        // fade the colors
    steps--;            // decrement steps
  }
}
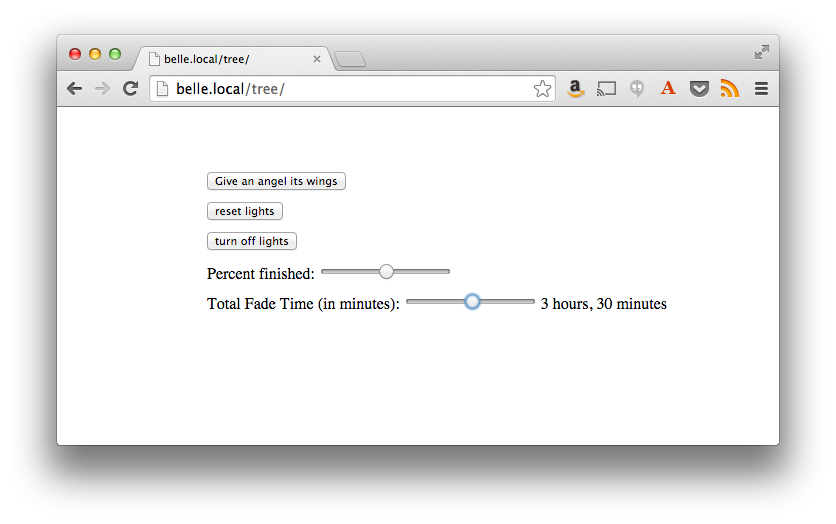
To add these functions to the user interface, I added two sliders to the web page.
Here’s what it looks like now:
 And here’s the new HTML page that adds the two sliders:
<!DOCTYPE html>
<html>
	<head>
		<script src="//cdnjs.cloudflare.com/ajax/libs/p5.js/0.3.14/p5.min.js"></script>
		<script src="//cdnjs.cloudflare.com/ajax/libs/p5.js/0.3.14/addons/p5.dom.js"></script>
		<script src="//cdnjs.cloudflare.com/ajax/libs/p5.js/0.3.14/addons/p5.sound.js"></script>
		<script>
	var twinkleButton, resetButton, offButton, result, mySound,fadeSlider;

function setup() {
  mySound = loadSound('/tree/Ding-sound-shiny.mp3');

  twinkleButton = createButton('Give an angel its wings');
  twinkleButton.position(150, 65);
  twinkleButton.mousePressed(twinkle);

  resetButton = createButton('reset lights');
  resetButton.position(150, 95);
  resetButton.mousePressed(resetStrip);

  offButton = createButton('turn off lights');
  offButton.position(150, 125);
  offButton.mousePressed(turnoff);

  var percentSpan = getElement("percent");
  percentSpan.position(150, 155);
  var percentSlider = getElement("percentSlider");
  percentSlider.mouseReleased(fastForward);

  var fadeTimeSpan = getElement("totalFadeTime");
  fadeTimeSpan.position(150, 185);
  fadeSlider = getElement("totalFadeSlider");
  fadeSlider.mouseReleased(setFadeTime);
}

function twinkle() {
	result = loadStrings("/mailbox/twinkle");
	mySound.play();
}

function resetStrip() {
	result = loadStrings("/mailbox/on");
}

function turnoff() {
	result = loadStrings("/mailbox/off");
}

function fastForward() {
	var mySlider = getElement("percentSlider");
	var myLabel = getElement("percentLabel");
	myLabel.html(mySlider.value() + "%");
	result = loadStrings("/mailbox/ff/" + mySlider.value() );
}

function setFadeTime() {
	var fadeLabel = getElement("totalFadeLabel");
	var sliderLabel = Math.floor(fadeSlider.value() / 60) + " hours, "
		+ Math.floor(fadeSlider.value() % 60) + " minutes";
	fadeLabel.html(sliderLabel);
	result = loadStrings("/mailbox/fade/" + fadeSlider.value() );

}

	</script>
	</head>
	<body>
		<span id="percent">
			Percent finished:
			<input type="range" id="percentSlider" min="1" max="100" step="1" /	>
			<label id="percentLabel"></label>
		</span>
		<span id="totalFadeTime">Total Fade Time (in minutes):
			<input type="range" id="totalFadeSlider" min="5" max="400" step="5" value="60" /	>
			<label id="totalFadeLabel"></label>
	</body>
</html>
It’s not a perfect web interface, as there’s no way to query the tree for its current state, and dynamically update the web page. But that leaves me a project for next year.
The final code and circuits for this project are available in the gitHub repository for this project.
Here’s one more video of the final effect in action:
Happy holidays!