Updated 19 Jan 2014
The address you type into your browser’s address bar is often the location of a particular document on a server. For example, http://tigoe.net/index.html refers to an HTML document living in the main directory of my server, tigoe.net. But URLs can be used to represent more than a file address. They can also be used to set or get the state of web-based application. For example, http://www.mystore.com/item/3045/price could be used to tell the application you want the price of item 3045. If you want the set the price, you could use http://www.mystore.com/item/3045/price/4.99. Web frameworks like Sinatra (for Ruby), Flask (for Python) and Express (for JavaScript through node.js) make it possible for you to build a web server that uses Representational State Transfer, or REST, as the control protocol for your application.
REST is a style of formatting URLs such that the URL itself describes the state of the thing it’s addressing. In the store example above, the URL is a representation of the item in the store (http://www.mystore.com/item/3045/price). To change the state of the item, you use another URL to represent that change (http://www.mystore.com/item/3045/price/4.99). At its simplest, REST means organizing your web application so that the URLs provide clear, sensible meaning as to what’s going on. For a more detailed explanation, see Understanding REST or Building Web Services the REST way. In this post, you’ll learn how to use a RESTian scheme as a communications protocol between a microcontroller and a web page using node.js and a little client-side JavaScript in the middle.
This post assumes you understand:
- How to use Arduino, including how to send and receive serial data
- How to write a web page, and what a server is
- A little about JavaScript
- A little about the command line
- Beginning experience with node.js. For my brief intro, see this post.
- You may want to read the previous two posts on node.js and JSON as well.
- A little about REST. See Understanding REST or Building Web Services the REST way to get an idea what the big deal is.
To make this happen you’ll need:
- An Arduino, and the Arduino IDE
- An RGB LED. I used this common anode model from Adafruit, but you could make it work with a common cathode LED too, with some modification of the Arduino sketch.
- An HTML5-capable browser. I used Chrome, but Opera or Firefox or Safari will work too)
- node.js and the following libraries for node:
To get set up, download the project from my GitHub repository. If you’re familiar with git, just clone the whole NetworkExamples repository. If you’re not familiar with git, then download the .zip file and copy the nodeRestToSerial directory to your user directory or desktop or wherever you like to work. Then open a terminal window and change directories into the nodeRestToSerial directory you just created. Finally, to install all the necessary libraries for node, type
npm install
The node package manager (npm) will then automatically install the needed libraries.
In the previous two posts, I explained how to use websockets to do connect a serial device and a browser using comma-separated values and using JSON. Websockets are useful when you need a continuous connection between client and server, but you don’t always need that. Often, you’re reacting to user-generated events that occur in the browser, and can make a single HTTP call when the event occurs . Using this method gives you a way to address the server without needing any client-side programming. This can be useful if you want to control a web application directly from a browser’s address bar, or if you want to control it from another application entirely, just by making a HTTP request. Since HTTP requests are discrete transfers, it also means a more robust connection between client and server. If the client loses network connection, it doesn’t have to start from the beginning; it can just continue requesting state updates for the parts of the system it cares about.
The application you’ll build in this lesson is very simple. You’ll control an RGB LED attached to an Arduino microcontroller through an HTTP call. When you’re done, you’ll be able to set the intensity of the red, green, and blue channels from your browser, or from any other application that can make an HTTP call.
The communications protocol for this application looks like this:
- /output/r/level – sets the level of the red LED (range from 0 to 100)
- /output/g/level – sets the level of the green LED (range from 0 to 100)
- /output/b/level – sets the level of the blue LED (range from 0 to 100)
The full address for your HTTP call might look like this:
http://www.example.com/output/r/34Although this application doesn’t do anything other than control the LED outputs, you’re using the command “output” at the beginning of the protocol to determine a unique route for the server. Each route defines a set of responses that the server might return. You’ll add other routes to serve files, and you could add still other routes to define other commands. The server won’t pass the “output” command on to the Arduino, it’ll just pass on the values to be set.
You can make combinations of colors after the output command. For example, /output/r/45/g/23/b/100 would set the red level to 45, the green level to 23, and the blue level to 100. As long as you have a color letter followed by a level, separated by slashes, you’re good.
The Server Script
The server script, called index.js, is the core of this application. You’re going to write a script that can tell the difference between a URL that represents a static file, like:
http://www.example.com/index.htmlor
http://www.example.com/js/myscript.jsand a URL that represents a state of the system, like this:
http://www.example.com/output/r/45Again, each different string after the server’s address is a different route; the route to /index.html is different from the route to the files in /js, and different from the /output route. The first two are routes to files on the server, and the third represents the state of the LEDs on the microcontroller board.
The Express.js module for node.js makes route differentiation easy. Express.js takes the request URL (for example, http://www.example.com/output/r/34) and gives you the route that follows the site address. You can set up different actions to perform for different routes.
You can configure Express.js to treat a whole directory as a location for static files. In this project, all of the css files are in a directory called /css, and all the client-side JavaScript files are in a directory called /js. Here’s how you can configure Express to serve those directories statically:
  // configure server to serve static files from /js and /css:
  app.use('/js', express.static(__dirname + '/js'));
Since you have only one HTML file, there’s no need to set up a /html directory. You can serve the index file like so:
// respond to web GET requests with the index.html page:
app.get('/', function (request, response) {
  response.sendfile(__dirname + '/index.html');
});
The only other route you care about begins with /output. The HTTP request from the client is parsed by express.js’ get() method into a number of request parameters. The first of these is the remainder of the request URL; that is, everything after /output. That’s the part you care about. The code below takes that remainder of the URL and sends it out the serial port. It also sends it back to the client.
// take anything that begins with /output:
app.get('/output*', function (request, response) {
  // the route is the first parameter of the URL request:
  var brightnessCommand = request.params[0];
  // send it out the serial port:
  myPort.write(brightnessCommand);
  // send an HTTP header to the client:
  response.writeHead(200, {'Content-Type': 'text/html'});
  // send the data and close the connection:
  response.end(brightnessCommand);
});
Try running the index.js script in the repository to see this in action. To run it, you need to know the name of an available serial port. Use the name of the port that your Arduino’s attached to. On my mac, it’s /dev/tty.usbmodem-411. On a Windows machine, it might be COM6. Type the following in the terminal to start node:
node restToSerial.js portName
In my case, it’s
node restToSerial.js /dev/tty.usbmodem-411
You’ll get a message like this:
opening serial port: /dev/tty.usbmodem-411
Listening for new clients on port 8080
The node app will also open a browser window to show you the user interface. Don’t worry about the fact that you haven’t programmed the Arduino yet; for now you just want to see the server’s response to the client. When the server script is running, open a web browser and type
http://localhost:8080/output/r/45/g/67/b/123You’ll get a reply like this:
/r/45/g/67/b/123
That’s the server sending you back what you sent it. You can change the values for red, green, and blue and get different replies. The server script is also sending those values out the serial port, so now it’s time to write an Arduino sketch to read them.
Stop the server script before working on the Arduino sketch because only one application can control a serial port at a time.
The Arduino Sketch
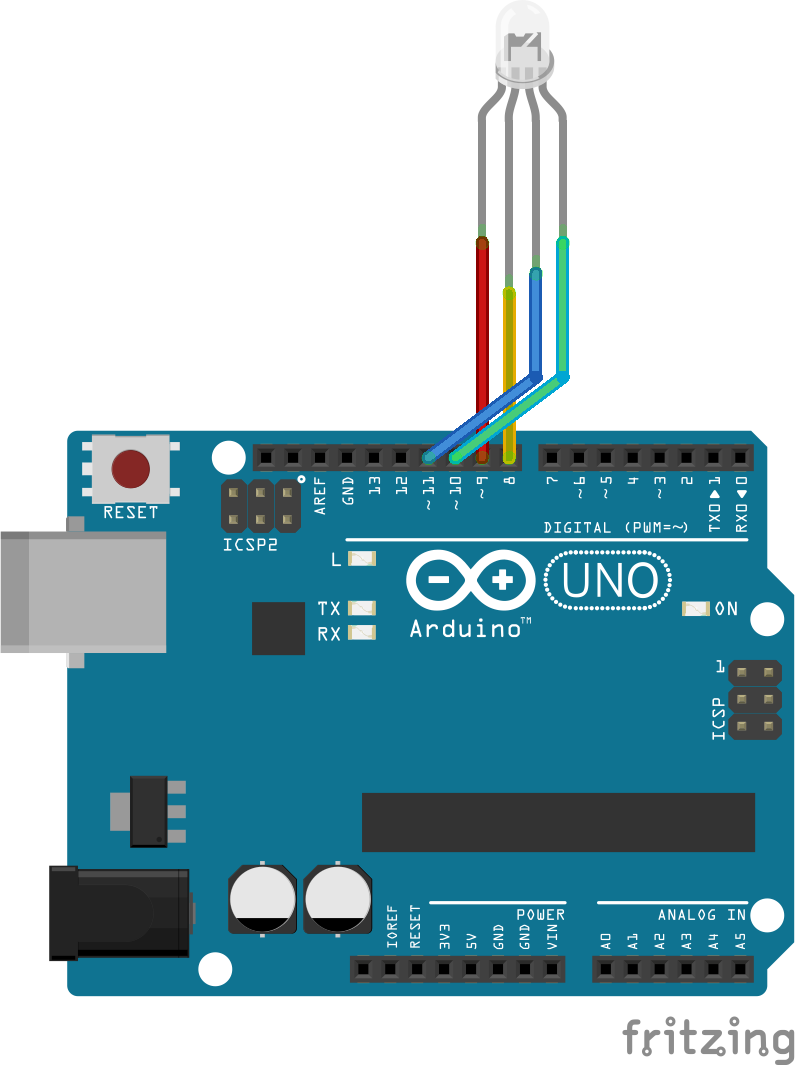
The Arduino sketch included in the gitHub repository for this project, RGBLEDControl.ino, controls an RGB LED using three PWM pins, pins 9, 10, and 11. The image below shows the wiring; the yellow wire is for the common anode.
The sketch starts by listening for incoming serial data, and filters for the relevant characters, r, g, or b, like so:
if (Serial.available() > 0) {
    int inByte = Serial.read();

    // respond to the values 'r', 'g', 'b'.
    // you don't care about any other value:
    switch (inByte) {
    case'r':     // red
      currentPin = redPin;
      break;
    case 'g':    // green
      currentPin = greenPin;

      break;
    case 'b':    // blue
      currentPin = bluePin;
      break;
    }
Given one of those three values, it sets the value of the output pin it will control. When the sketch has a legitimate pin number to set (anything other than 0) it starts looking for a value to use to set the pin, like so:
    // if you have a legitimate pin number,
    // use the parseInt function to listen for a level:
    if (currentPin != 0){
      int brightness = Serial.parseInt();

      // map the result to a level from 0 to 255
      // note: the reversal of the output values is because
      // you're using a common anode LED, and taking one of
      // the cathodes HIGH actually turns that channel off:
      brightness = map(brightness, 0, 100, 255, 0);

      // set the brightness for this color:
      analogWrite(currentPin, brightness);
    }
  }
Any characters that come in the serial port once the pin number is chosen are parsed to see if they represent an integer using the Serial.parseInt() function. Anything that’s not an r, g, b or a numeric character is ignored.
Upload the sketch included in the repository to your Arduino. Then open the Serial Monitor and type a few commands to it, like:
/r/45/g/67/b/123
You should see the RGB LED light up accordingly. Now close the Serial Monitor and run the server script again. Then open the same URLs you opened before. You should see the LED lighting up just like when you did it from the Serial Monitor. The server script is just passing that part of the URL through to your Arduino. Neat, isn’t it?
But wait! There’s more!
The Client-Side Script
Run the server script and type in:
http://localhost:8080You’ll get a page that looks like this:
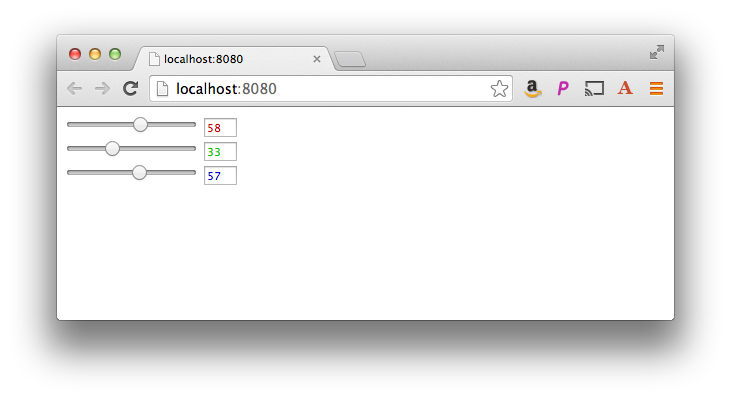
Try sliding the sliders up and down. They should change the brightness of the LEDs on your Arduino.
The sliders on this page are made using the HTML5 input range elements. There’s a little javaScript in the head of the indes.html page that uses the values of these range elements to set the text of the input elements, and to make the HTTP calls, as follows:
function setColor(ui, display) {
    display.value= ui.value;
    $.get("/output/"+ display.id + "/" + ui.value);
}
This snippet is using Zepto.js, a smaller version of JQuery, to make the HTTP calls.
The sliders call the JavaScript setColor() function when their values change. setColor() sets the value of the textbox next to the slider, and uses the value of the slider to make an HTTP GET request. This is where you’re going to set the LED. the URL for your request to the server looks like this:
/output/r/sliderValueThe server then takes everything that follows /output and sends it out the serial port to the Arduinom where it’s used to set the LED, as you saw above.
Making a GET request from scripts within a page like this lets you perform multiple exchanges with the server just using HTTP, no websockets required. You can update elements within the page this way without refreshing the whole page. It’s handy because you can check your requests directly from the browser’s address bar, using a URL that’s easy to remember because it’s a representation of what you want to happen. It’s also good because each request is a discrete transaction. Once the request is complete, there’s no connection between the server and client, so if you lose your network connection, both sides have a representation of the state of the system when they were last connected.
Because the requests are coming from the elements within the page, though, you don’t need to refresh the whole page every time something changes. You get an interface that’s quick and responsive to the user and robust in terms of connection between the server and client. See? REST in action!
2 Replies to “Using REST as a command protocol for web-to-serial applications”
Comments are closed.